Tarp Shelter Mastery: Six Fast Pitches
Why Tarp Shelters Matter
A tarp is one of the most versatile survival tools you can carry. It can become shade, rain protection, wind cover, emergency insulation, gear storage, or even a stretcher in extreme situations.
Unlike tents, tarps are lightweight, compact, adaptable, and extremely fast to deploy when practiced properly. A well-pitched tarp can keep you dry, reduce heat loss, improve morale, and protect critical equipment during storms or overnight travel.
Many experienced outdoors people carry a tarp even when they already have a tent because of how flexible and useful it becomes during bad weather or unexpected problems.
Objective
Learn six practical tarp shelter pitches and understand when to use each one depending on weather, terrain, wind direction, and available materials.
Choosing the Right Tarp
Not all tarps are equal. Cheap hardware-store tarps work for emergencies, but purpose-built camping or bushcraft tarps are usually stronger, quieter in wind, and easier to rig.
Good Tarp Features
- Reinforced tie-out points
- Waterproof coating
- Multiple attachment loops
- Lightweight but durable material
- Muted or natural colors for field use
Common survival tarp sizes range from 8x10 feet to 10x12 feet. Larger tarps provide more weather coverage but require more space and setup time.
Basic Shelter Principles
Before learning individual tarp pitches, understand these core concepts:
- Wind direction matters more than almost anything else.
- Low shelters are warmer and stronger in storms.
- High shelters provide better airflow in heat.
- Drainage matters—never sleep in low ground.
- Tensioned lines shed rain better than loose fabric.
A badly placed shelter in perfect shape still performs poorly.
Essential Hardware
- 8–10 stakes
- 15–20 meters of cordage
- Trekking poles or sticks
- Groundsheet or bivy
- Ridgeline cord
- Prusik loops for adjustable tension
Pre-tied guy lines save enormous time during bad weather.
Pitch #1: Flat Roof
The flat roof setup is simple and works well for shade or light rain in calm weather.
- High overhead coverage
- Excellent airflow
- Good group shelter
- Poor wind resistance
This setup is ideal for cooking areas, rest stops, or hot-weather camps where ventilation matters more than insulation.
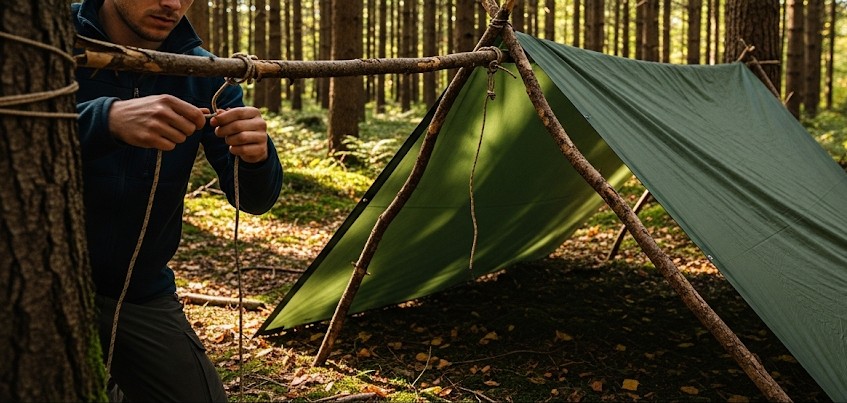
Pitch #2: A-Frame
The A-frame is the classic tarp shelter and one of the best all-around choices.
- Strong rain shedding
- Balanced airflow and protection
- Simple setup between trees
- Works in many climates
Run a ridgeline between two anchor points, center the tarp, and stake both sides down evenly.
Lower angles provide better storm protection. Higher angles improve airflow.
Pitch #3: Lean-To
A lean-to works best when wind comes from one predictable direction.
- Fast setup
- Easy access
- Good for fire reflection warmth
- Limited side protection
This is a classic cold-weather bushcraft shelter when combined with a properly managed fire in front of the opening.
Pitch #4: Plow Point
The plow point is one of the fastest emergency storm shelters.
- One high anchor point
- Three corners staked low
- Excellent wind shedding
- Very quick deployment
This shelter shines during sudden weather changes because it can be deployed rapidly with minimal hardware.
Many hikers use the plow point when arriving at camp during rain because setup time is extremely short.
Pitch #5: Flying V
The flying V provides excellent working space while maintaining decent weather protection.
- Good cooking shelter
- Open front visibility
- Quick setup
- Works well in moderate rain
It is less protective in severe storms but comfortable for camps where mobility and visibility matter.
Pitch #6: Storm Pyramid
The storm pyramid is the heavy-weather champion.
- Low wind profile
- Strong rain resistance
- Excellent heat retention
- Very stable in bad weather
A center pole supports the structure while all edges stay low to the ground.
Interior space is reduced, but protection improves dramatically during high winds and cold rain.
Site Selection Matters
Even the best tarp pitch fails if placed badly.
Avoid:
- Low drainage areas
- Dead trees or hanging limbs
- Flood channels
- Loose rock slopes
- Wind tunnels between ridges
Look For:
- Natural windbreaks
- Slightly elevated ground
- Good drainage
- Nearby anchor points
- Natural insulation like pine needles
Cold Weather Considerations
In winter conditions, shelter shape becomes critical.
- Pitch lower to trap warmth.
- Reduce open sides.
- Use ground insulation aggressively.
- Ventilate enough to reduce condensation.
- Clear snow loads from tarp surfaces.
Wet clothing and wind exposure destroy body heat faster than most people expect.
Real Example
During a mountain storm, a hiking team initially used an A-frame setup. As winds shifted and rain intensified, they converted to a lower plow-point shelter in under four minutes. The reduced wind exposure prevented tarp collapse and kept sleeping gear dry overnight.
Common Mistakes
- Pitching too high in storms
- Ignoring wind direction
- Loose ridgelines
- Poor drainage selection
- Not practicing setup beforehand
- Using weak knots
Most tarp shelter failures are setup failures, not equipment failures.
Recommended Practice Routine
The fastest way to improve is repetition.
- Practice one shelter at a time.
- Time yourself.
- Pitch in both calm and windy conditions.
- Practice at night using a headlamp.
- Test setups in real rain whenever safe.
A tarp setup that feels easy in the backyard becomes much harder in darkness, fatigue, and cold rain.
Checklist
- Tarp with reinforced tie-outs
- Pre-tied guy lines
- Ridgeline cord
- Prusik loops
- 8–10 stakes
- Groundsheet
- Trekking poles or sticks
- Repair tape
Contingencies
- No trees → use trekking poles or improvised center poles.
- Rocky ground → use deadman anchors with rocks or buried sticks.
- High wind → pitch low and reduce open sides.
- Heavy rain → tighten lines frequently as material stretches.
After-Action
After each trip or practice session, review what worked and what slowed you down.
Most experienced tarp users eventually standardize their cord lengths, knot systems, and shelter preferences to reduce setup time dramatically.
The best shelter setup is the one you can reliably build in bad conditions while tired, cold, and under pressure.
← Previous | All Articles | Next →