Vehicle Emergency Kit for Any Season
Objective
Build a vehicle emergency kit that keeps people warm, hydrated, visible, and communicating during breakdowns, traffic closures, storms, heat events, and unexpected overnight delays in any season.
Your first priorities are simple: get out of the traffic lane, make the vehicle visible, protect passengers from weather, communicate your location, and decide whether it is safer to repair, wait, or evacuate on foot. The kit is not just a pile of gear in the trunk. It is a small roadside survival system.
For a broader personal emergency setup, see Top 10 Items for Your First Bug-Out Bag.
Scenario (Example)
Example: A highway is closed by ice after dark. You have half a tank of fuel, two passengers, weak cell coverage, and temperatures dropping below −10°C. Tow ETA is “unknown.” The safest move may be to stay with the vehicle, conserve heat, mark the scene, and communicate your location instead of walking along a dark shoulder.
Vehicle emergencies are especially dangerous because they combine traffic, weather, poor visibility, stress, and mechanical problems. A good kit buys time and options.
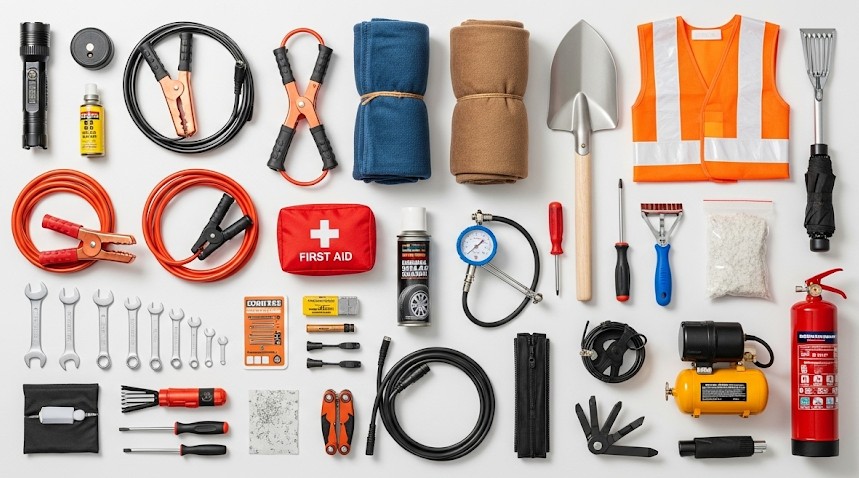
Kit Layout by Function
- People: wool blankets or sleeping bags, spare hats/gloves, chemical warmers, 3 L water/person, high-calorie bars, electrolyte packets.
- Shelter/Heat/Cool: wool blanket or bivy per seat, reflective windshield cover, small tarp, cordage, emergency ponchos, and shade materials for summer.
- Comms/Light: phone charger, 12V USB adapter, power bank, FRS/GMRS handheld if convoying, AM/FM radio, headlamps, road flares or LED beacons, triangle reflectors.
- Recovery/Repair: inflated spare, jack, base plate, lug wrench, tire sealant, plug kit, 12V compressor, jump starter, tow strap, duct tape, zip ties, and basic tools.
- Admin/Safety: high-vis vests, nitrile gloves, first-aid kit, paper map, cash, copies of insurance/roadside numbers, and emergency contact sheet.
Placement Map
- Driver door pocket: headlamp, high-vis vest, window breaker/seatbelt cutter.
- Glove box: insurance copy, roadside numbers, paper contact sheet, small flashlight.
- Under front seat: first-aid kit and nitrile gloves.
- Trunk left: tool roll, jack, base plate, plug kit, compressor.
- Trunk right: blankets, bivies, water, food, tarp, ponchos.
- Top access: triangles, flares, LED beacons, and high-vis gear should be reachable first.
Do not bury the most important gear under luggage. In a roadside emergency, the first items you need are visibility, light, gloves, and communications.
Step-by-Step: Breakdown on Shoulder
- Position and protect. Pull as far off the lane as possible. Turn wheels away from traffic, activate hazards, and avoid stopping on blind curves if you can safely roll farther.
- Make yourself visible. Put on a high-vis vest before stepping out. Place triangles or LED beacons behind the vehicle. Increase distance on highways, curves, hills, rain, fog, or ice.
- Assess the problem. Flat tire, dead battery, fuel, overheating, collision damage, weather, passengers, and traffic conditions all matter.
- Communicate location. Text your exact location: mile marker, nearest exit, road name, direction of travel, landmarks, and GPS coordinates if available.
- Decide repair or wait. If traffic, weather, or terrain makes repair dangerous, stay inside and wait for help.
- Manage passengers. Keep children, pets, and non-essential passengers away from traffic and inside the vehicle unless evacuation is safer.
For communications planning, see Comms Plan: Family & Team Preparedness.
Flat Tire Safety
A flat tire is not automatically a safe roadside repair. The shoulder may be narrow, soft, sloped, icy, or dangerously close to traffic.
- Loosen lug nuts before lifting the vehicle.
- Use a jack base plate on gravel, snow, mud, or soft shoulders.
- Chock the opposite wheel if possible.
- Keep your body out of the traffic side whenever possible.
- Do not crawl under a vehicle supported only by a jack.
- Recheck lug nuts after driving 50–100 km.
If the vehicle is unstable or traffic is too close, call for help. Pride is not a roadside safety device.
Winter Module
- Compact shovel
- Traction boards, sand, or non-clumping kitty litter
- Extra socks, gloves, hats, and base layers
- Insulated water bottle
- Hand warmers
- Windshield scraper and brush
- Small sleeping bag or wool blanket per person
If staying overnight in winter, run the engine only after confirming the tailpipe is clear of snow. Crack a downwind window slightly for ventilation and conserve fuel with timed heat cycles.
Summer Module
- Extra 4–6 L water
- Electrolyte packets
- Wide-brim hat
- Reflective tarp or windshield shade
- Sunscreen
- Lightweight gloves for hot metal and road work
- Cooling towel or bandana
Heat emergencies are sneaky. Shade first, then water, then electrolytes. Do not leave children, pets, or vulnerable adults in a hot vehicle.
Wet Weather and Flood Module
- Rain ponchos
- Waterproof gloves
- Microspikes or traction footwear for icy shoulders
- Larger jack base plate
- Dry bags for documents and electronics
- Spare towel and socks
Never drive through flooded roads. Vehicle recovery gear does not make moving water safe. For flood-specific planning, review Flood Readiness and Recovery.
Food, Water, and Medical
Vehicle kits should focus on durable, low-maintenance supplies. Choose food that tolerates temperature swings, requires no cooking, and can be eaten under stress.
- High-calorie bars
- Nut butter packets
- Electrolytes
- Hard candy for morale and quick energy
- Water bottles rotated seasonally
- Basic first aid with pressure bandage, gauze, gloves, and personal medications
For a stronger medical setup, see Home Medical Kit: Beyond Band-Aids.
Real Example
A family stranded during a mountain pass closure rotated engine heat 15 minutes per hour, placed triangles 50 m and 100 m back due to curves, and kept everyone in hats and bivies. They used text updates instead of repeated phone calls to conserve battery and shared warm drinks from a thermos. When plows reopened the route at 05:30, they were tired but safe.
Common Mistakes
- Burying triangles and vests under luggage.
- Carrying a compressor but no tire plug kit.
- Having a spare tire that is flat or missing tools.
- Running the engine with a buried tailpipe.
- Leaving water bottles to freeze and burst.
- Changing a tire on the traffic side when waiting would be safer.
- Assuming cell service will work everywhere.
Checklist
- Light per seat plus spare batteries
- Triangles, flares, or LED beacons
- High-vis vests
- Water 3 L/person plus electrolytes
- Blankets, bivies, hats, gloves
- Plug kit, compressor, jump starter, tow strap
- First aid kit and medications
- Paper map and emergency contacts
- Cash and insurance/roadside information
Contingencies
- Tailpipe buried: Dig it out before running the engine. Carbon monoxide can build quickly.
- No cell service: Leave a note on the dash with time, names, plate number, direction of travel, and plan.
- Must walk out: Go in daylight, wear high-vis, stay opposite the guardrail when possible, and leave a note.
- Heat illness risk: Shade first, then water and electrolytes. Rest during solar noon.
- Vehicle unsafe: Move passengers to a safer location only if traffic, fire, flood, or fumes make staying worse.
Final Thoughts
A good vehicle emergency kit is not about preparing for every possible disaster. It is about solving the most common roadside problems while keeping people safe long enough for conditions to improve or help to arrive.
Build the kit around your climate, commute, family size, and routes. Then check it seasonally. The best emergency kit is not the fanciest one. It is the one you can actually reach, understand, and use when the shoulder is icy and the tow truck is “maybe two hours away.”
After-Action
Replace used items immediately and log what happened: how long the plug kit took, how much fuel heat cycles consumed, what gear was missing, and what passengers actually needed. Adjust the kit for your climate and travel habits.
← Previous | All Articles | Next →