How to Cross a River Safely
Objective
River crossings are one of the most underestimated hazards in wilderness travel. Water that looks manageable from the bank can become powerful, cold, slippery, and disorienting once you are standing in it with a pack on. The objective is to cross swift water only when necessary, using careful site selection, proper body position, team methods, and a clear decision point for turning back.
The safest river crossing is often the one you avoid. A delayed crossing, longer route, bridge, shallower braid, or camped night waiting for lower flow may be the correct survival decision. Pride has no flotation value. If the water is too deep, too fast, too cold, or too uncertain, do not force the crossing.
Scenario (Example)
Example: Spring snowmelt has raised a mountain stream. The water is knee-to-thigh deep, cold, and opaque with braided sections downstream. The main channel upstream is narrow and fast, with a deeper chute and debris along the outside bend. Your group must decide whether to cross, where to cross, and how to manage cold exposure afterward.
Before committing to a crossing, review the route and alternatives. If navigation is already uncertain, crossing a river can make a bad situation worse by trapping the group on the wrong side. For route planning and map work, see Navigation 101: Map, Compass, Confidence .
Know When Not to Cross
The most important river-crossing skill is refusal. If the crossing feels wrong, it probably is. Water depth, current speed, cold temperature, poor footing, and downstream hazards all compound. Even shallow water can knock a person down if it is moving fast enough.
- Do not cross if the water is rising quickly.
- Do not cross directly above waterfalls, rapids, log jams, strainers, or deep pools.
- Do not cross if you cannot see or feel the bottom safely.
- Do not cross if group members are already exhausted, hypothermic, injured, or panicked.
- Do not cross at night unless there is no safer option.
- Do not let schedule pressure override obvious danger.
Streams fed by snowmelt are often lower early in the morning and higher later in the day after sun warms the snowpack. Waiting can sometimes help, but in other weather patterns water may rise with rain or upstream release. Watch the banks, debris movement, and water clarity for signs of changing flow.
Choose the Spot
Good site selection reduces risk before anyone gets wet. Look for wide, shallow, slower water rather than narrow, deep, fast channels. Braided sections are often safer because the current is divided into smaller flows, though they still require careful scouting.
- Look for wide, shallow, braided sections with slower current.
- Avoid outside bends where water is often deeper and faster.
- Avoid strainers such as fallen trees, root balls, fences, and debris piles.
- Scout both the entry and exit banks before crossing.
- Look downstream and ask: “If someone falls, where do they go?”
- Choose a crossing with safe recovery space below it.
Entry and exit matter. A shallow entry is not helpful if the far bank is a vertical mud wall, unstable boulder field, or brush tangle. Plan the entire crossing from dry ground to dry ground.
Prepare Before Entering
Preparation should happen on the bank, not in the current. Once you step into the water, your attention belongs to balance, footing, and communication.
- Unbuckle hip belt and chest strap so you can escape your pack if swept away.
- Secure loose straps so they do not snag on rocks or branches.
- Waterproof critical gear such as insulation layers, fire kit, phone, map, and first aid supplies.
- Keep footwear on. Bare feet are vulnerable to sharp rocks and poor traction.
- Change into water shoes or sandals only if they provide secure grip and will not come off.
- Identify the exact exit point before starting.
- Assign a leader and make sure everyone understands the method.
Keep dry layers protected. Cold water can turn a simple crossing into a hypothermia problem if clothing and insulation get soaked. For cold-exposure planning, review Cold Weather Survival Basics .
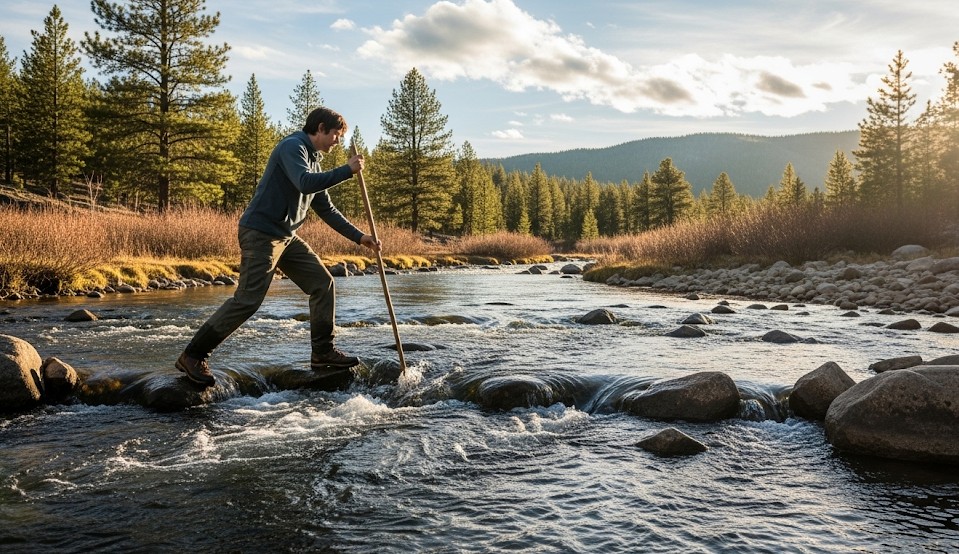
Solo Wading
Solo crossings require conservative judgment. Without partners to stabilize you, site selection and body position become even more important.
- Unbuckle hip belt and chest strap before entering.
- Face upstream at a slight angle rather than sideways to the current.
- Use a sturdy stick or trekking pole to maintain three points of contact.
- Shuffle feet instead of stepping high, which can reduce balance.
- Probe each step before committing weight.
- Move slowly and deliberately; do not rush the final third.
- If the water rises above mid-thigh with strong current, reassess immediately.
A staff or trekking pole should be planted upstream to brace against current. Keep your stance wide and knees slightly bent. The goal is stability, not speed.
Team Crossing
Teams have more options but also more chances for confusion. Everyone should know the plan before entering. The strongest or most experienced person should usually take the upstream position where they break current for others.
- Line abreast: Team members stand shoulder-to-shoulder or linked closely, strongest upstream. Move sideways together with short, deliberate steps.
- Mutual support line: Members hold onto each other’s pack straps or clothing carefully, avoiding entanglement. Communication must be clear.
- Single staff method: A stout pole is held by the middle person or shared across the group for stability. Rotate leadership if needed.
- Pack shuttle: In some cases, one person crosses first with minimal load, then gear is moved carefully, but this should not be attempted in dangerous water without proper skill.
Groups should move at the pace of the least confident member. If someone freezes or stumbles, stop, stabilize, and reassess. Do not drag a frightened person through current just because the group is halfway across.
Cold Water and After-Crossing Care
Cold water can reduce coordination quickly. Even if the crossing is successful, wet legs, soaked boots, and wind exposure can chill the body on the far bank. Plan the recovery before crossing.
- Put on a warm hat or dry layer immediately after crossing if conditions are cold.
- Drink something warm if fuel and time allow.
- Change socks if needed and protect feet from prolonged wet exposure.
- Check group members for shivering, fumbling, confusion, or clumsiness.
- Do not continue hard travel immediately if someone is chilled or shaken.
If the day’s travel is part of a longer route, build river crossings into the full plan. See Multi-Day Trek Planning: Pace, Food, Fuel, Margin for planning margins, bailout points, and route-card thinking.
Recovery if Swept Away
If you are swept off your feet, fight panic first. Roll onto your back with feet downstream and knees slightly bent. Your feet help fend off rocks, but do not try to stand in fast current because a foot can become trapped. Use a ferry angle to work toward shore.
Keep your head up, watch for downstream hazards, and aim for calm water, gravel bars, or eddies. If you can safely shed a heavy pack, do so, but avoid getting tangled in straps. Once out, get warm quickly and assess injuries.
Real Example
Three hikers reached a spring snowmelt crossing and rejected the obvious upstream route because it narrowed into a deeper chute with debris below it. They scouted downstream and found a braided gravel bar where the flow split into several shallower channels. After unbuckling belts, waterproofing insulation, and choosing a clear exit point, they crossed as a group using a shared staff. The crossing took about 90 seconds and avoided the more dangerous upstream channel.
Common Mistakes
- Crossing at the narrowest point because it looks shorter.
- Keeping pack straps buckled in swift water.
- Crossing above strainers, log jams, rapids, or waterfalls.
- Taking boots off and injuring feet on sharp rocks.
- Trying to stand up immediately after being swept away.
- Letting a schedule or ego force a bad crossing.
- Failing to warm up after cold-water exposure.
Checklist
- Wading staff or trekking poles
- Dry bags for insulation layers and critical gear
- Secure footwear with good traction
- Towel or small camp cloth
- Warm hat and dry socks
- Hot drink supplies for the far bank
- Map or GPS with alternate routes marked
- First aid kit for cuts, sprains, and cold exposure
Contingencies
- Rising water: Turn back, wait for lower flows, or find another route.
- Cold shock: Shelter, dry clothing, and warm drinks before continuing.
- Lost gear: Prioritize people over packs. Recover gear only if it is safe.
- Injury during crossing: Move to safety, stop bleeding, warm the person, and reassess route options.
- No safe crossing found: Camp, reroute, or retreat. A longer walk beats a short swim with consequences.
If water access and survival water planning are part of your route, you may also find Desert Survival: Water and Shade Priorities useful for thinking about water decisions in harsh environments.
After-Action
After the trip, note which river features predicted depth and velocity best. Record where the safe crossing was found, what time of day the water was lowest, whether footwear worked, and whether dry gear stayed dry. These observations improve future route planning.
River crossings deserve respect every time. Slow down, scout carefully, unbuckle your pack, use support, and be willing to turn around. The river will not be impressed by your itinerary, and it absolutely does not care that you already told everyone you would be home by dinner.
← Previous | All Articles | Next →