
Building a Shelter from Natural Materials
Objective
In a survival situation, shelter is often more urgent than food and sometimes even more urgent than fire. Wind, rain, snow, heat loss, wet ground, and exposure can weaken a person quickly, especially after sunset or during bad weather. The objective is to get out of wind and precipitation quickly, reduce heat loss, and create a protected rest area using minimal tools and natural materials.
A good emergency shelter does not need to be pretty. It needs to be safe, fast, insulated, and positioned correctly. The best shelter is usually the one you can finish before conditions get worse. A half-built masterpiece offers less protection than a simple low shelter completed before dark. Natural materials such as leaves, pine needles, branches, bark, grass, and snow can provide impressive insulation when used in enough quantity.
Scenario (Example)
Example: You are caught on a wooded trail after losing daylight. The temperature is dropping, rain is expected overnight, and you have a small tarp, cordage, a knife, and limited dry clothing. Your priority is to create a low, wind-resistant shelter, insulate yourself from the ground, and preserve enough energy to stay warm until morning.
If you also need fire for warmth or signaling, review Fire-Making: 5 Methods Without Matches . Shelter and fire work best as a system, but shelter usually comes first when wind and precipitation are the main threats.
Site Selection
The location of your shelter matters as much as the design. A well-built shelter in a poor location can still flood, collapse, or expose you to falling branches. Before building, pause and study the area carefully.
- Choose high, drained ground that will not collect runoff.
- Avoid gullies, dry streambeds, flood channels, and low depressions.
- Look up for dead branches, unstable trees, loose rock, or snow-loaded limbs.
- Use natural windbreaks such as boulders, dense brush, ridges, or fallen logs.
- Face the entrance away from prevailing wind when possible.
- Stay close enough to resources such as debris, wood, and water, but not so close that you camp in a hazard zone.
Drainage is critical. If rain starts at 2 a.m., you do not want to discover your bed is the local creek’s backup plan. Look for slope direction, water marks, damp soil, and piles of debris that show where water has flowed before.
Fast Rigs
The best shelter type depends on what you carry, what materials are available, and how much time remains before dark or bad weather. If you have a tarp, use it. If you do not, a debris shelter can still work, but it requires far more material than most beginners expect.
A-Frame Tarp
An A-frame tarp is one of the fastest and most reliable emergency shelter options. It sheds rain well, blocks wind from both sides, and creates a protected sleeping space under a ridgeline.
- Run a ridgeline between two trees at about chest height.
- Drape the tarp evenly over the ridgeline.
- Stake or tie down the corners tightly.
- Add mid-panel guylines if the tarp has tie-outs.
- Lower the windward side toward knee height for storm protection.
For heavy wind, keep the profile low. A tall tarp catches wind like a sail, and sails are great when you are on a boat, not when you are trying to sleep under a tarp in a storm.
Lean-To + Reflector
A lean-to is useful when paired with a fire and a heat reflector. It is open on one side, so it is not as stormproof as an A-frame, but it can reflect warmth well in cool, dry conditions.
- Stake one long edge of the tarp to the ground.
- Raise the opposite edge with poles, cord, or a ridgeline.
- Face the open side toward the fire, away from the strongest wind.
- Build a waist-high log or rock reflector several feet beyond the fire.
- Keep flames and sparks far enough away to avoid melting fabric or igniting debris.
If you plan to cook near camp, review Cooking Over an Open Fire: Campfire Techniques for safe fire placement, coal control, and cleanup.
Debris Hut (No Tarp)
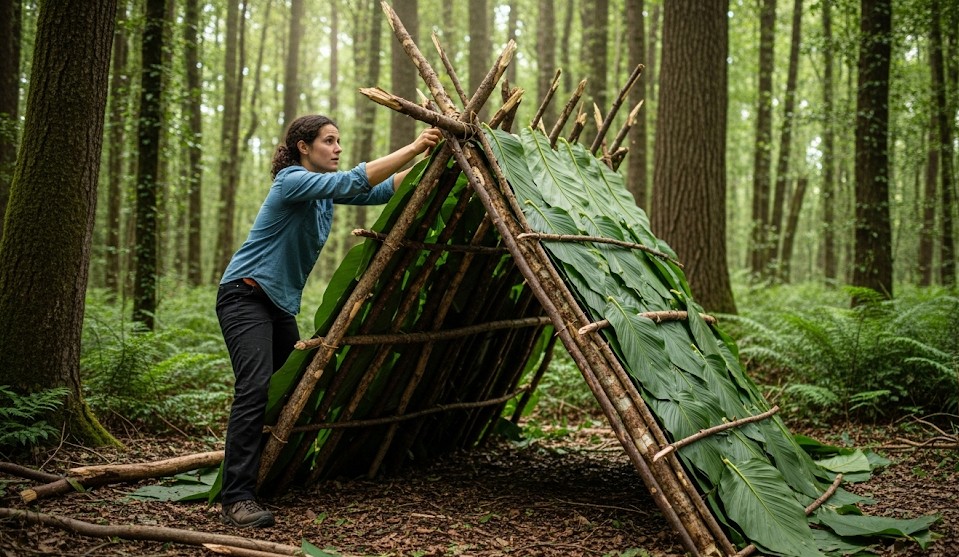
A debris hut is a natural-material shelter designed to trap body heat. It is best for cold, wet, or windy conditions when no tarp is available. The key is using a lot of insulation. A thin layer of leaves is not enough.
- Place a strong ridgepole from the ground to a stump, forked branch, rock, or low tree crotch.
- Stack ribs along both sides to create a narrow triangular frame.
- Add smaller sticks across the ribs to hold debris in place.
- Cover the structure with 18–24 inches of leaves, pine needles, grass, or similar debris.
- Stuff the inside with thick dry leaf litter to insulate from the ground.
- Keep the entrance small and plug it with a pack, branches, or bundled debris.
The inside should be just large enough for your body. Extra air space is harder to warm. Think sleeping bag, not living room.
Insulation & Ground Work
The ground steals body heat fast. Even if the air feels manageable, cold or wet soil can drain warmth all night. Build a bed before you worry about comfort. At least 4–6 inches of dry material beneath you is a good minimum, and more is better in cold conditions.
- Use dry leaves, pine needles, grass, bark, evergreen boughs, or spare clothing as ground insulation.
- Avoid crushing insulation too flat; trapped air provides warmth.
- Create a slight raised bed if the ground is damp.
- Vent a small gap near the top of enclosed shelters to reduce condensation.
If the weather is hot instead of cold, shelter priorities change. Shade, airflow, and reducing radiant heat become more important than trapping warmth. For heat-specific tactics, see Surviving in Extreme Heat .
Storm Pitch Adjustments
When wind and rain increase, lower the shelter profile and tighten all anchor points. A tarp pitched high and loose may flap loudly, shed water poorly, and eventually fail. In storm conditions, low and tight usually wins.
- Lower the windward side close to the ground.
- Angle the shelter so rain drains away from your bed area.
- Use rocks, logs, or buried sticks as anchors if stakes will not hold.
- Keep gear inside the dry zone, not touching tarp walls where condensation forms.
- Digging trenches is usually unnecessary and can damage the site; choose drainage correctly instead.
For stronger wind planning, review Storm-Grade Shelter in High Winds , especially if you expect exposed terrain or coastal weather.
Common Errors
- Pitching in low spots that flood during rain.
- Using too little debris on natural shelters.
- Leaving open ends facing the prevailing wind.
- Building too large of a shelter to warm effectively.
- Forgetting ground insulation and losing heat from below.
- Building under dead branches or unstable trees.
- Waiting too long to start shelter construction.
20-Minute Drill
Practice setting an A-frame tarp and converting it to a low storm pitch without moving the ridgeline. Start in daylight, then repeat the drill at dusk or with your eyes partially covered to simulate poor visibility. Time yourself from packed tarp to usable shelter.
Next, practice making a natural debris bed. Many people are surprised by how much material is required to create real insulation. This drill teaches an important lesson without waiting until a cold night to learn it the hard way.
Checklist
- Tarp, emergency blanket, poncho, or large plastic sheet
- Paracord or bank line
- Knife or multitool
- Stakes, rocks, or natural anchors
- Dry leaves, grass, pine needles, bark, or evergreen boughs
- Gloves for gathering branches and debris
- Fire-starting tools if using a reflector fire
- Headlamp for building or adjusting shelter after dark
Contingencies
- No tarp: Build a debris hut or natural windbreak with heavy ground insulation.
- Heavy rain: Prioritize drainage, low pitch, and keeping bedding off wet ground.
- High wind: Lower the shelter, reduce exposed fabric, and use stronger anchors.
- Cold night: Reduce shelter size and increase debris insulation.
- No trees: Use trekking poles, paddles, sticks, rocks, or packs as structure supports.
After-Action
After practicing or using a natural shelter, review what worked. Did the shelter block wind? Did rain drain away correctly? Was there enough insulation underneath? Did condensation build up inside? Did your anchors hold? These details matter because shelter mistakes often feel small during setup but become miserable after midnight.
The best wilderness shelter is not the fanciest one. It is the one you can build quickly, safely, and with enough insulation to protect your body from wind, water, and the ground. Practice before you need it, because emergency shelter building is one skill where “figuring it out live” is a lousy business model.
← Previous | All Articles | Next →