Building a Rainproof Fire After Days of Rain
Objective
Building a fire after days of rain is one of the most frustrating wilderness skills because almost everything feels damp, cold, heavy, and uncooperative. The objective is to get a reliable cooking flame in saturated conditions by finding dry inner wood, creating a hot-start fire lay, shielding the ignition area from rain, and feeding the fire in the right order.
A rainproof fire is not really waterproof. It is a fire built with enough preparation and heat to overcome wet surroundings. The key is not luck; it is process. You need dry tinder, small dry fuel, airflow, protection from falling rain, and patience before adding larger damp wood. Throwing wet logs onto a tiny flame is not firecraft. It is just a smoke machine with emotional baggage.
If you need broader fire fundamentals first, review Fire-Making: 5 Methods Without Matches . Wet-weather fire building uses the same basics, but with much less forgiveness.
Scenario (Example)
Example: It has rained for two days. The forest floor is soaked, fallen branches are wet through the bark, and the wind keeps pushing mist under the trees. You need to boil water, warm hands, and create enough coals for simple cooking. You have a fixed blade, ferro rod, lighter, a small tinder kit, tarp, cordage, and limited dry clothing.
In this situation, your first job is not lighting the fire. Your first job is preparing the fire so it has a chance to survive. That means finding better wood, splitting it to the dry core, building a base above wet ground, and creating enough feather sticks and small splits before striking a spark.
Wet-Weather Fire Principles
Wet conditions punish shortcuts. A normal dry-weather fire may tolerate imperfect tinder or oversized fuel. After days of rain, the fire needs a carefully built fuel ladder and protection from heat loss.
- Dry core matters: Wood may be wet outside but dry inside if it is dead standing or protected.
- Small fuel comes first: Thin curls and pencil-sized splits ignite faster than large sticks.
- Airflow is critical: A wet fire needs oxygen and heat, not a smothering pile of damp fuel.
- Ground moisture steals heat: Build on a platform of bark, sticks, stone, or split wood.
- Protection buys time: A tarp edge, overhang, or natural cover can keep ignition materials from getting soaked during startup.
Finding Better Fuel
Groundfall is usually the worst option after prolonged rain. It soaks up water, contacts wet soil, and often hides rot. Look instead for dead standing wood, broken branches caught above the ground, dry lower branches on conifers, or the inner cores of larger pieces.
- Choose dead standing wood when possible.
- Avoid punky, rotten, sponge-like wood.
- Break test small sticks: dry sticks snap; wet sticks bend or tear.
- Check sheltered sides of logs, stumps, and root tangles.
- Look under dense evergreen branches for drier material.
In many forests, resinous wood, dead conifer branches, birch bark, fatwood, or dry inner splits can help. Use local materials responsibly and avoid damaging live trees unless a true emergency requires it.
Fuel Ladder (Wet-Wood Version)
A fuel ladder is the sequence of fuel sizes that lets a fire grow. In rain, the ladder must be more detailed and more generous. Prepare more than you think you need before lighting anything.
- Feather sticks from split dry cores
- Pencil-lead thin shavings and curls
- Pencil-thick dry splits
- Finger-thick dry splits
- Thumb to wrist-thick split wood for sustaining heat
- Larger damp fuel only after a strong coal bed forms
Feather sticks work because thin curls expose more surface area and catch flame quickly. Make 10–15 feather sticks before ignition if conditions are truly wet. This feels excessive until the first five fail, at which point you will suddenly become a believer.
Build Above Wet Ground
Wet ground can kill a small fire by stealing heat from below. Build a platform before placing tinder. Use bark slabs, split sticks, flat stones, or green logs as a base. The platform should lift your tinder and first fuel away from mud, puddles, snow, or saturated leaves.
A log cabin base works well because it creates airflow and keeps the flame structure organized. Place the driest material in the center and protect it until the moment of ignition.
Steps
- Harvest dead standing wood or elevated dead branches. Avoid soaked groundfall when possible.
- Split wood to expose dry inner cores using a fixed blade and baton if safe.
- Make 10–15 feather sticks and a pile of very thin dry shavings.
- Build a raised base from bark, split sticks, or a small log cabin platform.
- Pitch a tarp edge or use natural cover to keep rain off the ignition zone while maintaining ventilation.
- Place tinder and feather sticks in the center with pencil-thick fuel ready in reach.
- Ignite with lighter, ferro rod, or prepared tinder.
- Feed only small dry splits until the flame is strong and a coal bed begins forming.
- Add thumb-thick splits gradually, then larger fuel only after heat is established.
For safe cooking once the fire is established, see Cooking Over an Open Fire: Campfire Techniques . Wet-weather cooking is much easier once you have coals instead of just flames.
Wind & Rain Control
Rain and wind attack the fire in different ways. Rain cools the fuel and tinder. Wind steals heat, disrupts flame, and can blow sparks into unsafe areas. Control both without creating a fire hazard.
- Pitch a low tarp with a vent gap so smoke and heat can escape.
- Keep flame far enough from nylon, plastic, or coated fabric to prevent melting or ignition.
- Use your body, pack, logs, or rocks as a temporary windbreak during ignition.
- Build the fire small and hot before expanding it.
- Keep spare feather sticks and tinder under cover.
A tarp can help, but it is not a fireplace. Keep flames, sparks, and rising heat well away from fabric. If the tarp starts sagging, smoking, or smelling hot, move the fire or adjust the pitch immediately.
Tarp and Shelter Coordination
In prolonged rain, fire building and shelter building support each other. A small covered work area lets you split wood, prepare tinder, and protect kindling. However, your sleeping shelter and fire area should be arranged carefully so smoke, sparks, and carbon monoxide do not become hazards.
For shelter setup in bad weather, review Building a Shelter from Natural Materials and Storm-Grade Shelter in High Winds .
Ignition Options
Carry more than one ignition method. Wet conditions are exactly when cheap, redundant tools prove their worth.
- Lighter: Fast and simple, but may struggle if wet or cold.
- Ferro rod: Works when wet but requires prepared tinder.
- Storm matches: Useful backup if stored waterproof.
- Prepared tinder: Cotton with petroleum jelly, waxed tinder, commercial tabs, or dry birch bark can make a major difference.
- Char cloth: Useful with sparks but must be kept dry.
A fire kit belongs in a waterproof bag or container. If your fire kit is soaked, it has politely resigned from its one job.
Cold and Wet Exposure
A wet-weather fire often matters because cold exposure is already becoming a problem. If someone is shivering, clumsy, soaked, or confused, manage hypothermia risk immediately. Fire helps, but shelter, dry clothing, insulation from the ground, and warm drinks matter too.
For cold-weather warning signs and actions, see Cold Weather Survival Basics .
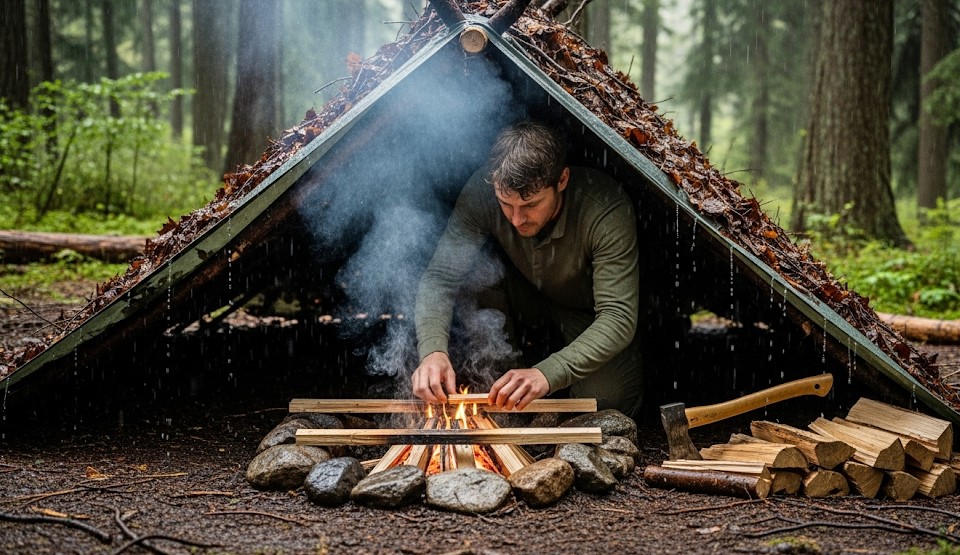
Real Example
After two days of rain, a small team needed to boil water in a soaked spruce forest. Ground sticks bent instead of snapping, so they found dead standing spruce and split it to dry inner cores. They made a large pile of feather sticks, built a raised log cabin base, and worked under the edge of a tarp with a vent gap. Once the flame caught the dry curls, they fed only small split wood until a coal bed formed. The team boiled 1 liter of water in about seven minutes using a keyhole-style cooking channel beside the main flame.
Common Mistakes
- Trying to light wet groundfall instead of finding dry inner wood.
- Making too few feather sticks before ignition.
- Adding large damp wood too early.
- Building directly on wet soil or snow.
- Smothering the fire with poor airflow.
- Letting tarp fabric hang too close to flame.
- Using all tinder before the fuel ladder is ready.
Checklist
- Fixed blade or sturdy knife for splitting
- Ferro rod, lighter, and waterproof matches
- Prepared tinder in a waterproof container
- Tarp and cordage
- Gloves for handling wet wood
- Small dry bag for tinder and feather sticks
- Pot with lid for boiling water
- Fire-safe base material such as bark, stone, or split wood
A compact fire kit also fits naturally into a basic emergency loadout. For related gear planning, see Top 10 Items for Your First Bug-Out Bag .
Contingencies
- No knife: Use naturally split wood, sharp rock edges, or smaller dead branches; increase feather and shaving quantity.
- Persistent rain: Extend tarp coverage, keep fuel staged under cover, and cook on a coal side channel.
- No dry tinder: Search under bark, inside split wood, under evergreen cover, or use clothing lint if available.
- Wind increases: Lower the fire profile, improve windbreaks, and protect ignition materials.
- Fuel is scarce: Prioritize boiling water and warm drinks over maintaining a large comfort fire.
After-Action
After the trip or drill, record which tree species produced the best dry cores in your area. Note what tinder worked, how many feather sticks were actually needed, whether your tarp pitch protected the fire safely, and how long it took to boil water.
Wet-weather fire building is a skill worth practicing before you need it. Learn to split to the dry core, build off wet ground, protect your tinder, and feed the fire patiently. Rain does not make fire impossible; it just charges a higher cover fee.
← Previous | All Articles | Next →